Jupyter Notebook is a very popular project in the data science field. It is quite powerful and easy to use. This post focuses on setting up Jupyter Notebook on the local machine with Apache Spark.
There are many tutorials out there which require installing multiple binaries and then glue them together to make sure things work as expected. If you want to set up scala kernel, it just adds time and effort.
Thankfully Jupyter publishes a docker image (all-spark-notebook). This image comes with multiple kernels (Apache Toree, spylon-kernel, and couple more) to support Python, R, and Scala code. Please go through Jupyter Docker stacks to explore the different images being offered. I wanted both Python and Scala support and went ahead with all-spark-notebook image.
Run the following command to get the notebook running in less than a minute.

Here is a sample scala code (from spark example):
As you increase the value of num_samples, you should get a value closer to the actual value of PI.
Python version for the same code (from spark example)
There are many tutorials out there which require installing multiple binaries and then glue them together to make sure things work as expected. If you want to set up scala kernel, it just adds time and effort.
Docker the savior
Thankfully Jupyter publishes a docker image (all-spark-notebook). This image comes with multiple kernels (Apache Toree, spylon-kernel, and couple more) to support Python, R, and Scala code. Please go through Jupyter Docker stacks to explore the different images being offered. I wanted both Python and Scala support and went ahead with all-spark-notebook image.
Installation
Run the following command to get the notebook running in less than a minute.
$ docker run -p 8888:8888 jupyter/all-spark-notebookYou should see the following text after a successful startup.
[I 20:55:07.888 NotebookApp] Serving notebooks from local directory: /home/jovyan
[I 20:55:07.888 NotebookApp] The Jupyter Notebook is running at:
[I 20:55:07.888 NotebookApp] http://6aa882287c00:8888/?token=ade56950bc5b71ee26c62652389a8c60a8d2173542046285
[I 20:55:07.889 NotebookApp]  or http://127.0.0.1:8888/?token=ade56950bc5b71ee26c62652389a8c60a8d2173542046285
[I 20:55:07.889 NotebookApp] Use Control-C to stop this server and shut down all kernels (twice to skip confirmation).
[C 20:55:07.894 NotebookApp]
To access the notebook, open this file in a browser:
file:///home/jovyan/.local/share/jupyter/runtime/nbserver-5-open.html
Or copy and paste one of these URLs:
http://6aa882287c00:8888/?token=ade56950bc5b71ee26c62652389a8c60a8d2173542046285
or http://127.0.0.1:8888/?token=ade56950bc5b71ee26c62652389a8c60a8d2173542046285
It contains a URL at the end, open it in a browser to access the notebook. Let's create a new scala notebook and run a sample code:

First Run
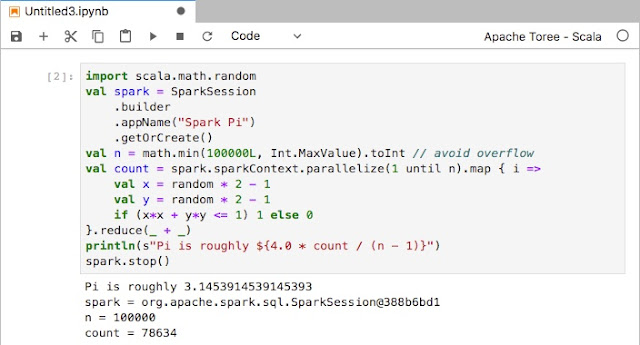
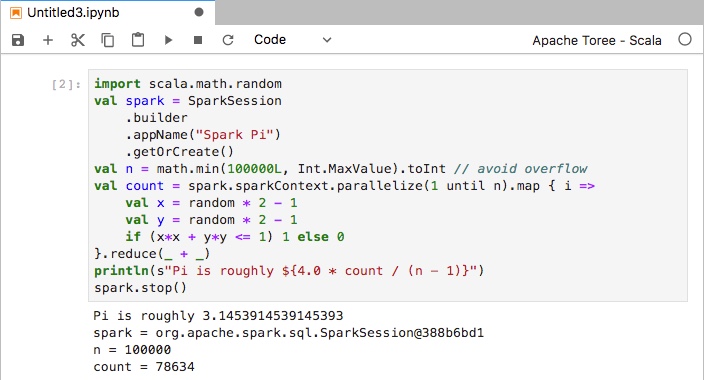
Here is a sample scala code (from spark example):
import scala.math.random
val spark = SparkSession
    .builder
    .appName("Spark Pi")
    .getOrCreate()
val n = math.min(100000L, Int.MaxValue).toInt // avoid overflow
val count = spark.sparkContext.parallelize(1 until n).map { i =>
    val x = random * 2 - 1
    val y = random * 2 - 1
    if (x*x + y*y <= 1) 1 else 0
}.reduce(_ + _)
println(s"Pi is roughly ${4.0 * count / (n - 1)}")
spark.stop()
As you increase the value of num_samples, you should get a value closer to the actual value of PI.
Python version for the same code (from spark example)
from random import random
from operator import add

from pyspark.sql import SparkSession

spark = SparkSession\
    .builder\
    .appName("PythonPi")\
    .getOrCreate()

n = 10000
def f(_):
    x = random() * 2 - 1
    y = random() * 2 - 1
    return 1 if x ** 2 + y ** 2 <= 1 else 0

count = spark.sparkContext.parallelize(range(1, n + 1)).map(f).reduce(add)
print("Pi is roughly %f" % (4.0 * count / n))
Configuration
There are few issues with the current setup:- A token to access the notebook. Each time you restart the container, you need to copy the token from the log.
- Any notebook create/update is not persisted. If you restart your container, you lose your notebook and code.
- USP of the notebook is interactive development. It is preferable to run code against local files for quick prototype and testing. In the current setup, you need to manually copy files each time container is restarted.
- Image doesn't have many basic linux utilities like vim, less etc. Container is started with user `jovyan` by default. You cannot run `sudo apt-get install` as password for user is not available.
$ docker run -d --rm \
-v $PWD/work:/home/jovyan/work \ # mount work
-v $PWD/data:/home/jovyan/data \ # mount data
-p 8888:8888 \ # port binding
-e JUPYTER_ENABLE_LAB=yes \ # nicer UI
--name notebook \
jupyter/all-spark-notebook \
start-notebook.sh --NotebookApp.token='' # no tokens
You can run the following command which starts bash as root user, and install whatever you want.
$ docker exec -it -u root notebook bashI prefer docker-compose file to avoid copy-pasting such big command mentioned above. Here is my docker-compose.yaml
version: '3.5'
services:
  notebook:
    image: jupyter/all-spark-notebook
    container_name: notebook
    ports:
      - "8888:8888"
    user: root
    volumes:
      - ./work:/home/jovyan/work
      - ./data:/home/jovyan/data
    environment:
      - JUPYTER_ENABLE_LAB=yes
    command: start-notebook.sh --NotebookApp.token=''
Now, to start notebook, I just need to run `docker-compose up -d ` and voilà.